Curtains can go very, very wrong. If you go overboard, you end up with something heavy and expensive and claustrophobic, like one of those getups Sally Field wore in Lincoln. On the other hand, don’t ignore them until too late, after all the remodel money has been spent. Like I did. With my husband threatening to thumbtack a bed sheet over the beautiful new windows “to stop the spying,” I faced a desperate situation.
“Let’s review,” said my husband, who likes his privacy. “How exactly did we end up adding only two new rooms but 21 new windows?”
Um, the architect likes “light?” At least that’s what he said when he showed me the plans. It looked like a good idea on paper, too. All that light. Of course, now that we’ve moved in we practically have to walk around in sunglasses. So what’s the solution (and how much did I end up spending)?
Photographs by Mimi Giboin.

Strategy No. 1: Don’t panic. Instead, walk from room to room and evaluate each window calmly. As Brooklyn-based architect Frederick Tang puts it, “What do you need from each of your windows? Is this a room where you want to sleep in utter pitch darkness? Or do you live somewhere where the site has privacy and your amazing views are the thing you are concerned about?”

Strategy No. 2: Hang simple solid-color curtain panels.
Why choose curtains (instead of blinds, say, or shades) for some windows? Says Tang, “It is a classic trick to use curtains to enlarge the visual effect of window. Often people will place them bunched up a foot or two off to the side of window, so will look as if a window is bigger.”
To get the most visual impact, “curtains look nicest when they go from the floor all the way to the ceiling, even if the window is not full height,” says Tang.

Strategy No. 3: Sew your own. In my both my living room and guest bedroom (above), twin panels frame the casement windows. These were pretty much the easiest sewing project evers. My friend Stephanie, who is an excellent seamstress as well as being an interior designer, drew me a pattern on the back of an envelope. All I had to do was cut long lengths of fabric, sew lining onto them, press, and hem.
The point of these curtains was to absorb sounds and to add a layer of texture to the rooms. In the living room privacy wasn’t a concern even for my husband–it’s a living room, after all–so instead of using a zillion yards of fabric, I made two 56-inch-wide panels. I never “close” them, and if I did, they wouldn’t entirely cover the windows. In all, I used six yards of Cream Linen Fabric ($14.99 a yard from Ballard Designs).
To add weight and body to the curtains, I lined each panel with cotton Roc-Lon White drapery lining ($4.19 a yard from Jo-ann Fabrics).
Cost of the living room curtains: $125.

Above: No need to sew a rod pocket. I attached clips to the top of each panel.
Cost of the living room curtain hardware: one Cambria Oil Rubbed Bronze Curtain Rod ($49.99) and four packages of Cambria Oil Rubbed Bronze Curtains Rings (currently on sale for $4.99 per package) at Bed Bath and Beyond, $90.

Strategy No. 4: Use the money you saved in other rooms to splurge on custom shades or blinds for the bedroom.
In the bedroom you don’t want to skimp. You spend at least one-third of your life in this room, so you want good coverage: for privacy and to block the sunlight on Saturday morning when your husband takes the dogs out and lets you sleep in.
In my bedroom (above) are custom Roman Shades from The Shade Store. You can save money here by measuring your windows yourself and installing your own shades after they arrive (they’re shipped in long cardboard boxes to your house).
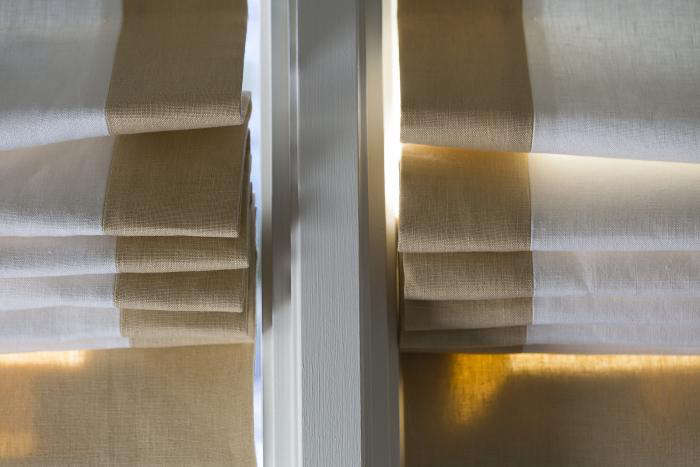
The big question is always whether to hang shades (and blinds) on the outside of the window jamb or to recess them. Says Tang: “If the window jamb is deep enough, it’s nice to hang them inside because it gives more of a custom look. It’s more tailored and looks a little more finished.”
For the recessed option, you need to cut the blind or shade precisely– within a quarter of an inch of the width of the window.
Total cost of seven lined bedroom shades: $2,826.

Strategy No. 5: Some windows may not need anything. At my house, I identified ten windows–in the kitchen and adjoining family room–that could remain bare. The view was nice, there was no need for privacy, and it was a cleaner look.
The trick to leaving windows bare, says Tang, is to be uniform. In a room, if you leave one window uncovered, you also should leave all the other windows uncovered because “you don’t want one to look like an orphan.”
Another way to achieve an uncovered look is to think ahead–far, far ahead–and to include in the remodel design recessed curtain tracks or pockets for shades. “You can build a pocket on a window, where essentially the trim above the window falls a little lower to hide the shade that’s behind it,” says Tang. Here’s an example of the finished look, from one of his projects with a former firm.
Total cost: $0. (I know that’s self-evident, but the figure made me so happy I couldn’t resist typing it.)
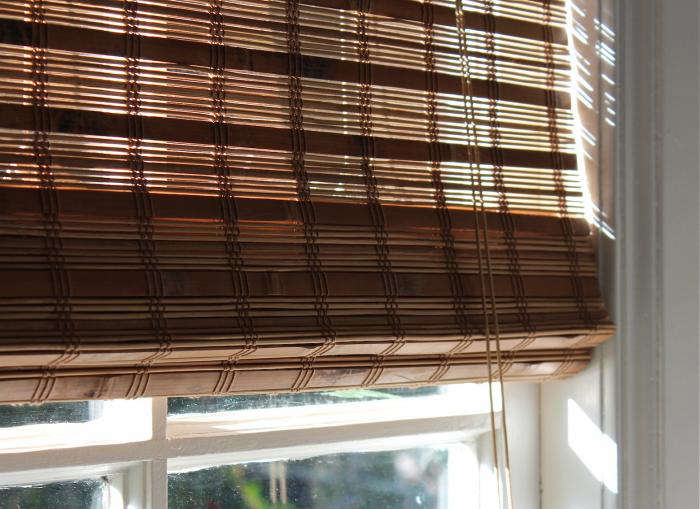
Strategy No. 6: Inexpensive cut-to-order wooden or bamboo shades. In my home office (above), late afternoon sun is a problem. it causes a glare on the computer screen. Photograph by Michelle Slatalla.
“Windows that are south-facing need more attention than windows that are north-facing, because of sun,” says Tang. “For situations like that, I like very simple shades. It’s amazing how many customized options there are that give you a lot of bang for your buck.”
Tang, who lives in a pre-war building in Brooklyn, covered his own windows with custom cut shades from Home Depot. “They have a valence; I live in a very traditional house where that sort of detail is appropriate to the architecture.”
My inside mount bamboo shades (above) came from Payless Decor, which offers a wide selection at budget-friendly prices. After I measured the windows and placed the order online, the shades and hardware necessary for installation arrived on the doorstep about three weeks later. They were easy to hang and fit perfectly.
Total cost of six Payless Decor bamboo shades (22.5 inches wide by 53 inches high): $193.81.
Grand total: $3,500.
And the windows look so much nicer than if they were covered with bed sheets.
For more of Michelle’s amateur adventures in home design, see The Death of the Shower Curtain and My Worst Design Decision Ever.
N.B.: This is an update of a post published February 18, 2013 during our Film Fest week.


Have a Question or Comment About This Post?
Join the conversation