Late winter is the time of year when gardens in New York look their worst, but when hopes for their future are at an all-time high. It’s the season of seed catalogs and bed planning, and when we get to the halfway point in the month, it’s time for seed starting. It might be ambitious for a gal already sharing 240 precious square feet of space to also endeavor to start seeds in her city apartment, but I’ve got big plans for my window box, and I wanted to try my hand at doing everything from scratch.
See more of Erin’s DIY Adventures.
Photographs by Erin Boyle.
Above: In the spirit of do-it-yourself gardening, I decided to make my own pots from last Sunday’s paper. If you have an urge to begin a garden project of your own, consider these pots.
Here’s what you’ll need:
Materials
- Newspaper.
- Scissors, such as Clauss 6-Inch Scissors ($12.95 from Knife Center).
- Straight-sided glass.
- Twine (optional).
- Potting soil.
- Seeds, such as Heliotrope ($3.25 per packet from John Scheeper’s)
- Tray with a handle, such as a Metal Tool Tray via Etsy.

Above: To begin, find yourself some good black and white pages from your weekend newspaper delivery (or your neighbor’s recycling bin). Avoid densely colored or shiny papers as they could leach dyes into your soil. Unfold your newspaper and tear one open sheet along its center crease so you’re starting with a long, narrow half sheet. Next, fold that sheet in half, lengthwise, and in half again–also lengthwise–so you’ve got one long and skinny strip of newspaper.

Above: Next, take a straight-edged glass and place it on one end of the strip, with its top edge roughly in the middle of the newspaper.

Above: Slowly wrap the newspaper strip around your glass. When you reach the end of your strip, half of the width of newspaper should still be overhanging the lip of the glass.

Above: I tied a string around the glass to keep the newspaper in place. This step is not totally necessary, so if you find yourself without string, not to worry.

Above: After you’ve tied your string (or even if you haven’t), fold the edge of the newspaper into the open glass. Don’t worry about being neat, just stuff the paper in.

Above: Next, carefully wriggle the glass out of the newspaper circle. Then use your fingers to tamp down the upturned edge of newspaper inside your pot. The aim is to create a bottom for the pot. At this point, you can also reinsert your glass to help create the bottom. If the newspaper edges inside your pot aren’t perfectly flat, that’s OK. Some folks choose to tape them down, but the pot will stay put on its own without tape. It’s perfectly fine if your pots are a little lopsided; the addition of soil and water will even them out.

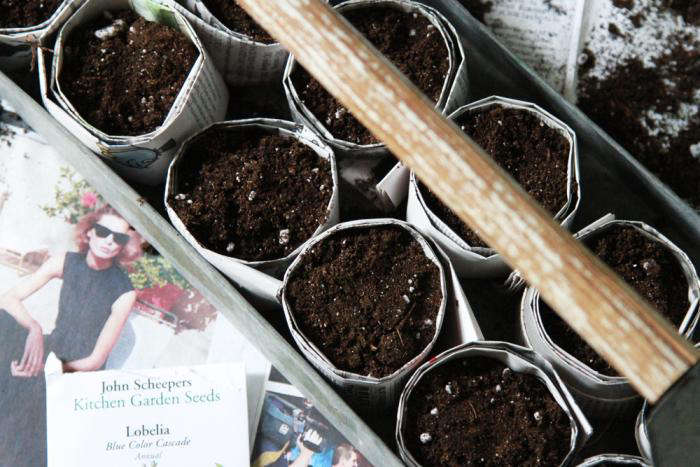
Above: The next step for starting my seeds was to fill my newly minted pots with rich, moist potting soil.

Above: I used a galvanized vintage tool tray to house my pots. Because my seed starts will be making the grand tour of my apartment in a quest for the sunniest spot, I wanted them to live in something that would be pleasant to look at, whether perched atop the toilet or taking a turn in the middle of the apartment floor.

Above: After my soil was in place, I watered it and planted my seeds. I chose three annual flower varieties from John Scheepers Kitchen Garden Seeds in my native Connecticut. It’s a terrific small seed company and the seed packets feature beautiful botanical illustrations by Bobbi Angell.

Above: The salvia I chose likes a little added moisture, so I covered those pots with plastic wrap and labeled my pots with hanging tags, just to be sure I remembered which was which as they begin to sprout. It’ll take a few weeks for these seeds to germinate. In the meantime, I’ve got fingers and toes firmly crossed.
See more of Erin’s DIY Adventures.
Explore more: Wooden Pot Maker, Planting Pots for Starting Seeds Indoors, Kitazawa Seed Co.
N.B.: This is an update of a post published March 2, 2013 during our Do-It-Yourself week.


Have a Question or Comment About This Post?
Join the conversation